The LEMP Stack is similar to the LAMP Stack, the only difference is that you will have nginx (pronounced engine x) instead of apache.
You wont much differences in between the two but here are some.
- uses less resources on the server so it will handle more concurrent connections if you have a very busy site.
- Is quite good as a reverse proxy server (load balancer).
- Very fast at serving static content.
- Does NOT have native PHP interpreter.
What you will need:
- Ubuntu Server (if you don't have one you can view my other tutorial on how to install Ubuntu in Virtualbox)
Installing Nginx.
Once you have an Ubuntu machine we check that the Ubuntu repositories are up to date.
sudo apt-get update
Next we actually install nginx
sudo apt-get install nginx
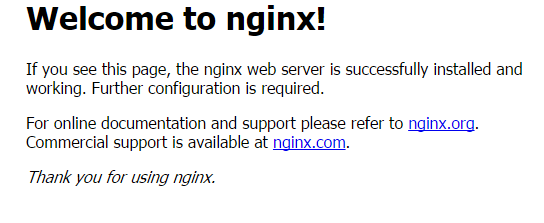
You can test if the server is up and running by accessing your server’s domain name or public IP address in your web browser. You should receive this message.
Installing MySQL.
You can install this simply by entering:
sudo apt-get install mysql-server
I should ask you to enter a new mysql root password, if not then check out this.
Now you would want to type.
sudo mysql_secure_installation
It will ask some simple questions and you hit y or n simple!
Make sure if you want to keep the same root password, you hit n on “change root password”
Installing PHP
Now we have nginx for serving webpages and mysql to storing data we now just need a bridge it all together.
Since Nginx does not have a PHP interpreter we need to install an extra PHP module.
php5-fpm allows nginx to talk to php via fastcgi
[code language=”bash”]sudo apt-get install php5-fpm php5-mysql[/code]
Configure PHP .
open the configuration file for php fpm
sudo nano /etc/php5/fpm/php.ini
What we are looking for in this file is the parameter that sets cgi.fix_pathinfo.
This will be commented out with a semi-colon (;) and set to “1” by default.
This is an extremely insecure setting because it tells PHP to attempt to execute the closest file it can find if a PHP file does not match exactly. This basically would allow users to craft PHP requests in a way that would allow them to execute scripts that they shouldn’t be allowed to execute.
We will change both of these conditions by uncommenting the line and setting it to “0” like this:
cgi.fix_pathinfo=0
Save and close the file when you are finished.
Now, we just need to restart our PHP processor by typing:
sudo service php5-fpm restart
This will implement the change that we made.
Configure Nginx to Use PHP.
Now, we have all of the required components installed. The only configuration change we still need to do is tell Nginx to use our PHP processor for dynamic content.
We do this on the server block level (server blocks are similar to Apache’s virtual hosts). Open the default Nginx server block configuration file by typing:
sudo nano /etc/nginx/sites-available/default
Currently, with the comments removed, the Nginx default server block file looks like this:
server {
listen 80 default_server;
listen [::]:80 default_server ipv6only=on;

root /usr/share/nginx/html;
index index.html index.htm;

server_name localhost;

location / {
try_files $uri $uri/ =404;
}
}
We need to make some changes to this file for our site.
- First, we need to add an index.php option as the first value of our index directive to allow PHP index files to be served when a directory is requested.
- We also need to modify the server_name directive to point to our server's domain name or public IP address.
- The actual configuration file includes some commented out lines that define error processing routines. We will uncomment those to include that functionality.
- For the actual PHP processing, we will need to uncomment a portion of another section. We will also need to add a try_files directive to make sure Nginx doesn't pass bad requests to our PHP processor.
The changes that you need to make are highlighted in the text below:
server {
listen 80 default_server;
listen [::]:80 default_server ipv6only=on;

root /usr/share/nginx/html;
index index.php index.html index.htm;

server_name server_domain_name_or_IP;

location / {
try_files $uri $uri/ =404;
}

error_page 404 /404.html;
error_page 500 502 503 504 /50x.html;
location = /50x.html {
root /usr/share/nginx/html;
}

location ~ \.php$ {
try_files $uri =404;
fastcgi_split_path_info ^(.+\.php)(/.+)$;
fastcgi_pass unix:/var/run/php5-fpm.sock;
fastcgi_index index.php;
fastcgi_param SCRIPT_FILENAME $document_root$fastcgi_script_name;
include fastcgi_params;
}
}
When you’ve made the above changes, you can save and close the file.
Restart Nginx to make the necessary changes:
sudo service nginx restart
server {
listen 80 default_server;
listen [::]:80 default_server ipv6only=on;

root /usr/share/nginx/html;
index index.php index.html index.htm;

server_name server_domain_name_or_IP;

location / {
try_files $uri $uri/ =404;
}

error_page 404 /404.html;
error_page 500 502 503 504 /50x.html;
location = /50x.html {
root /usr/share/nginx/html;
}

location ~ \.php$ {
try_files $uri =404;
fastcgi_split_path_info ^(.+\.php)(/.+)$;
fastcgi_pass unix:/var/run/php5-fpm.sock;
fastcgi_index index.php;
fastcgi_param SCRIPT_FILENAME $document_root$fastcgi_script_name;
include fastcgi_params;
}
}
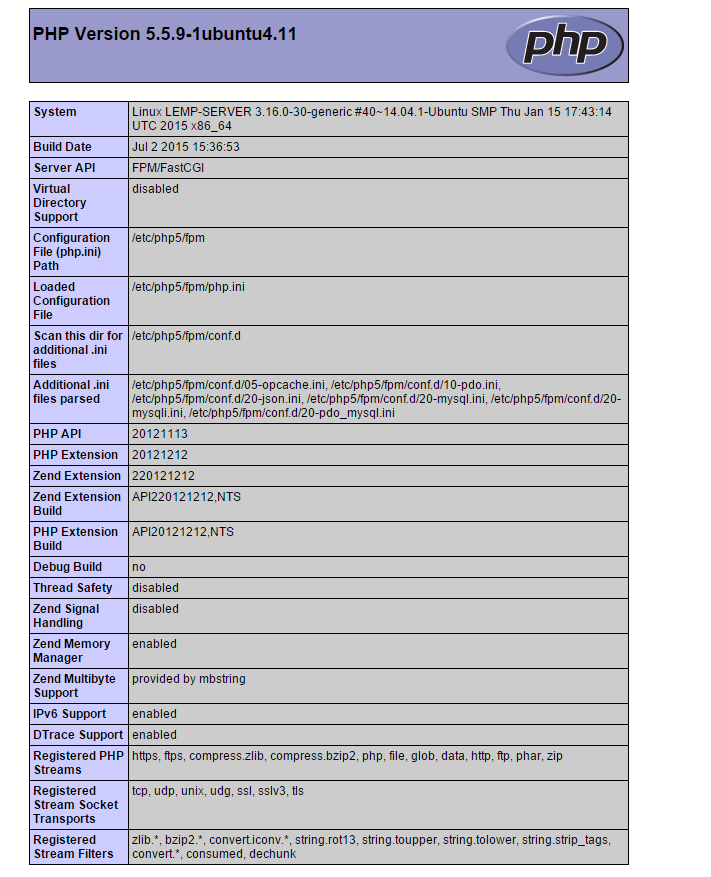
Create a PHP File to Test Configuration
Your LEMP stack should now be completely set up. We still should test to make sure that Nginx can correctly hand .php files off to our PHP processor.
We can do this by creating a test PHP file in our document root. Open a new file called info.php within your document root in your text editor:
sudo nano /usr/share/nginx/html/info.php
We can type this into the new file. This is valid PHP code that will return formatted information about our server:
<?php
phpinfo();
When you are finished, save and close the file.
Now, you can visit this page in your web browser by visiting your server’s domain name or public IP address followed by /info.php:
http://server_domain_name_or_IP>/info.php
You should see a web page that has been generated by PHP with information about your server: